Showing posts with label 烘培. Show all posts

Monday, September 21, 2020

Cinnamon Rolls

 Well, as usual, I barely baked as not really 'good' on it and also due to the cold weather here.. the bread always turned up not so good. I tried this recipe more than once, the good thing about this is you can make the dough and put in your fridge overnight or few days. Once you ready to bake, just take out .. roll it flat .. apply the cinnamon paste and bake ! And of course, my kids LOVE it!! 

Here the youtube link i refer to : https://www.youtube.com/watch?v=oTdU13pryV0

But i did not add in the topping cream, as i prefer it to be just cinnamon rolls with the sticky cinnamon paste :p


Thursday, August 27, 2020

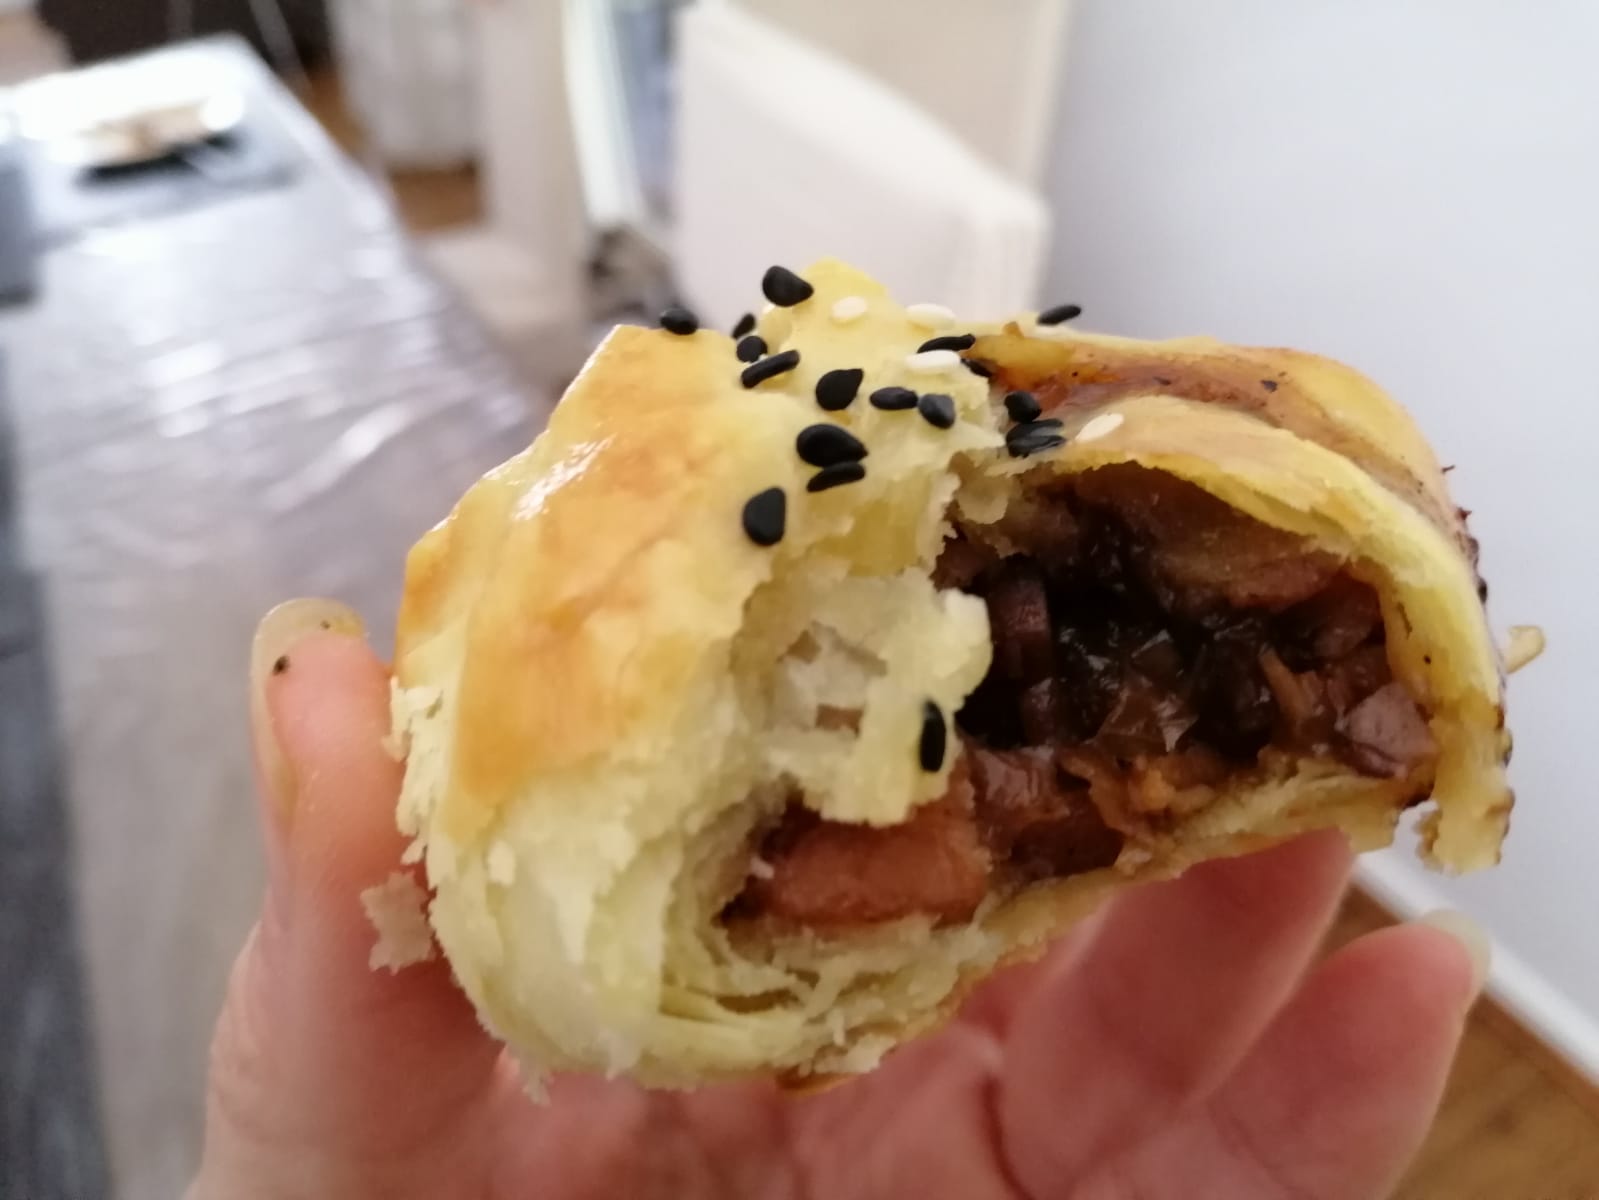
烧包

Siew pao... 烧包 .. Seremban 烧包 is very famous in Malaysia, but to me as long as the filling is tasty enough and the skin not too thick, I would be very  happy to grab for 2-3 easily :)  I seldom make all the 'complicated' recipe as quite lazy on top of daily chores... During the lockdown now in Victoria, life been too boring.. and there was leftover 'char siew' ... so just search for some 'simplest' recipe and do it !! 

Well, really took me lots of times and efforts >.< 


I am refering to this youtube:
https://www.youtube.com/watch?v=2d7f04YMbX0

Ingredients :

Water dough (水皮) :
200g plain flour(普通面粉)2/3 cup x 2
60g butter or margarine (牛油或玛芝琳)
2 tbsp caster sugar(细砂糖)
120 ml water(水)

Oil dough (油皮) :
160g plain flour(普通面粉)1 cup + 2 tbsp
100g shortening(白油)/ 150g butter
2 tbsp oil (油)
250g pork belly (五花肉)
2 onions, medium size (中型洋葱)
100g green peas (青豆)

Seasoning (调味料):
1 tsp dark soy sauce (黑酱油)
1 tbsp oyster sauce (蚝油)
1 tsp pepper (胡椒粉)
1/2 tsp five spice powder (五香粉)
1 tsp light soy sauce (生抽)
1 tsp salt (盐)
3 tbsp sugar (糖)

1/2 tbsp corn flour (玉米粉)
1 tbsp water (水)


Thursday, July 30, 2020

Pandan Chiffon Cake

I had tried few recipe before but turned out not so good. A friend of mine gave me 2 'aluminium mold' medium size ... so trying out with this recipe that i found from youtube... Apron, a very good channel for simple and easy instructions, which turned up to be the best trial I had before.

p/s: This recipe works well, since my 'cake mold' is bigger, I had re-calculate the measurement to cater for bigger mold. The small disposable mold seriously not enough for my 'chiffon cake fans' 's kids   ^_^'


Ingredients:

Instructions:
  1. Get ready for the pandan juice (i am using the ready drops from asian groceries)
  2. Mix the Egg yolk batter
    • Separate 3 egg yolks and whites
    • Add Caster Sugar ( 1 1/2 tbsp) and mix
    • Add Oil (coconut or etc) 20 ml
    • Add coconut milk 50 ml (~3 tbsp)
    • Add pandan juice 30 ml and mix all
    • Shift 5 tablespoon of cake flour
  3. Egg white batter
    • Electric mixer -> egg white
    • Add cream of tartar 1/8 teaspoon
    • Add caster sugar 5,1/2 tbsp and mix until stiff peaks
  4. Mix some of the Egg white batter into yolk batter
  5. Mix all the yolk batter into the egg white batter
  6. Quick mix and put into oven to bake 150 celcious for 45-50 (bigger portion will be 1 hr)
============================================================
Bigger version

https://mykitchen101en.com/pandan-sponge-cake/

Ingredients:
-  4 egg yolks (grade A/size: L, room temperature)
-  60 g (1/4 cup + 2 tsps) fine sugar
-  50 g (1/4 cup) corn oil (or other vegetable oil)
-  60 ml (1/4 cup) pandan juice*
-  120 g (1 1/4 cups) low protein flour (cake flour)
-  1 tsp baking powder

Ingredients for meringue:
- 4 egg whites (grade A/size: L, room temperature)
- 1/4 tsp cream of tartar
- 60 g (1/4 cup + 2 tsps) fine sugar

Directions:
1 Grease and line 9-inch (23-cm) round baking pan with parchment paper.

Sunday, July 12, 2020

Pizza base - quick w/o yeast version

COVID-19 Stay at home... Trying to make food with whatever we have... try to reduce the no. of time going out for groceries.. Here found 1 recipe from my friends fb post.

I need to x 2 the ingredient as need to make 2 pizzas to feed the hungry kids :)


DRY INGREDIENTS:
1 1/3 cups bread flour ( x 2 = 2  2/3 cups)
2 tsp baking powder (x2 = 4 tsp)
3/4 tsp salt (x2 = 1  1/2 tsp)
3/4 tsp sugar (x2 1  1/2 tsp)

WET INGREDIENTS:
2 tsp olive oil (x2 = 4 tsp)
1/2 cup water (cold tap water x 2 = 1 cup)

OTHER
1 tbsp Extra Flour , for dusting
2 tsp vegetable oil (optional) , for brushing crust (or canola or other neutral oil) (Note 3)

Instructions
- Preheat oven to 250°C / 480°F (230°C fan) (Note 4.) Place shelf in the top quarter of the oven.
- Spray pizza pan or baking tray lightly with oil.
- Prepare pizza sauce and toppings. Keep shredded mozzarella in the fridge (Note 5).

Bread Machine
Just put all in and set for Dough function

ROLLING OUT DOUGH:
  1. Dough should be soft and elastic, and not stick to your hands. It will not be completely smooth like yeast dough (video 38 sec)(Note 6).
  2. Shape dough into a ball. Roll out into a 30cm/12" round.
  3. Transfer to pizza pan, preferably with holes (for crispier base), or a baking tray (Note 7 pizza stone). Use your fingers to pull from the centre to fill the pan to the edge - avoid pinching the edges (to ensure puffy crust!).
TOP & BAKE:
  1. Top with 1/4 cup pizza sauce and toppings of choice.
  2. Brush the crust edge (just exposed edge with no toppings on it) with oil.
  3. Bake 12 minutes, until the edges are crispy and golden. Cut and serve immediately!

Thursday, May 7, 2020

Dinner Roll

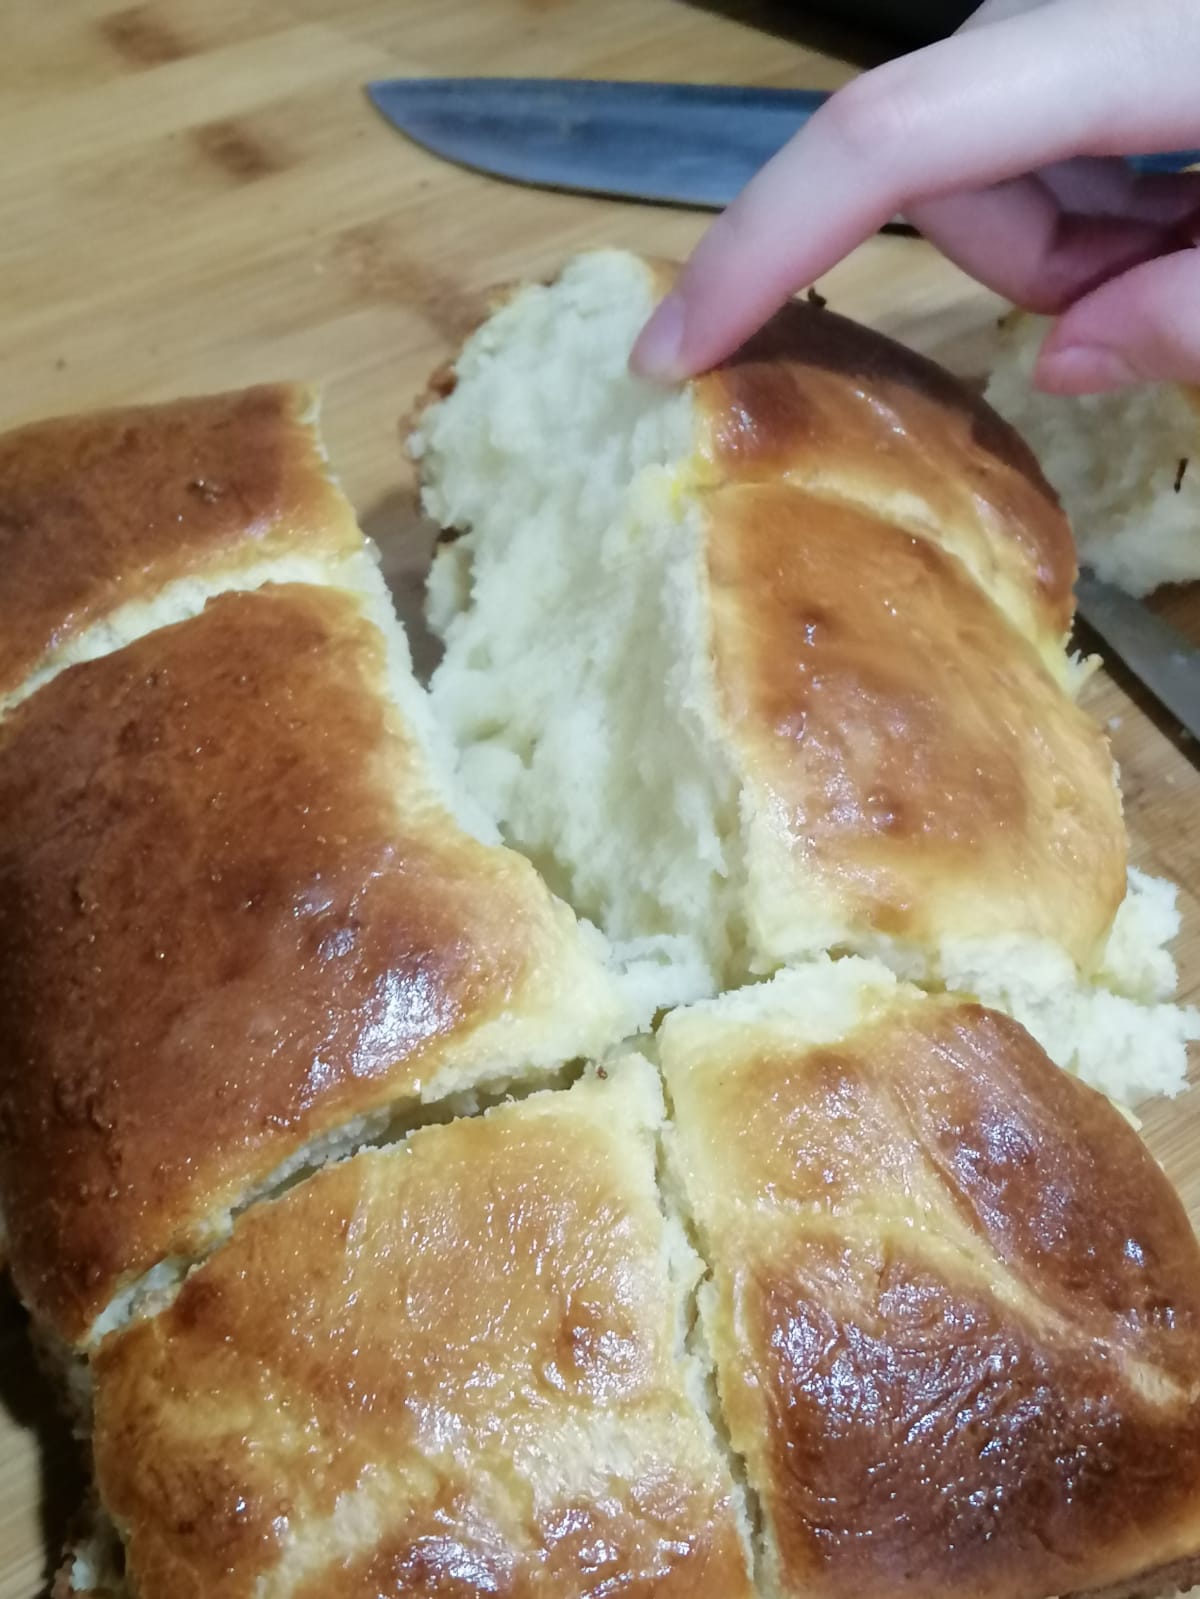
终于第一次成功烘面包!!

I saw one simple recipe and think to give it a go! And GOT IT!!  I better note it down before i forgot.

Starter:
Water - 3 tbsp
Milk - 3 tbsp
Bread Flour - 2 tbsp

Dry Ingredient:
Bread Flour - 2 1/2 cup
Sugar - 1/4 cup
Salt - 1 tsp
Yeast - 1 tbsp

Wet Ingredient:
Warm Milk - 1 cup
Butter - 1/4 cup (60 gram)
Egg - 1

Instructions:
1. Mix the starter and stir in a small pan until sticky. Put in a bowl, cover with cling wrapped, freeze for 1 hour.
2. Mix the dry ingredient. I just pour into the bread maker.
3. Mix the wet ingredient with starter and pour into the bread maker container.
4. Turn on dough function or manually dough, let it sit for 1 hour. (If using bread machine, it will sit inside within the dough function to doulbe the size).
5. Take out the dough , use some oil to dough a bit and divide into 9 portion.
6 Optional : You can put in pulled pork, BBQ pork belly, etc. Or just plain.
7. Let it sit for another 40 minutes.
8. Egg wash the top and put in the oven for 25 minutes (185 degree fan-forced)

AND DONE!!


Friday, April 24, 2020

Marble Cake

Recently really do a lot of baking.. Getting recipe from friends and try out. Having 3 kids, good thing about this is they can simply finish whatever i bake very quickly. (of course with the condition of the taste not too bad, haha)..

Here come my easy marble cake


Ingredient:
Butter - 250g
Sugar - 200-250g (0.9 cup) I prefer not too sweet
Egg - 4 Vanilla - 1 tsp
Self-raising flour - 250g (1.9 cup)
Milk - 3 tbsp
 Coco mixture 1. 1 tsp of coco powder + 3 tsp hot water

Instruction: Preheat oven 180c
1. Add melted butter into a bowl and beat with electric mixer.
2. Slowly add in sugar and mix.
3. Add in egg 1 by 1 and mix.
4. Add in vanilla
5. Add in Self-raising flour (can split in 3 times)
6. Add milk
7. Take out 1/4 cake batter and mix it with coco mixture.
8. Pour in the 3/4 cake batter into cake tray.
9. Slowly added the coco mixture on top, take a skewer or chopstick to swirl it :)
10. Bake for 35 min... and Done!!

Another way is divide the batter into 1/2, mix the coco with the other 1/2 batter, then scoop in the cake batter with the mixing of 2 color.. but i just too l lazy to do that. :p

Friday, March 27, 2020

Air fry roasted pork belly

Finally, before i forgot, better note down the recipe I used for my successful roasted pork belly. Really yums, skin crispy ... whole plate gone with wind within 5-10 minutes.


I am using the recipe from this site.


In fact, I do not need to 'boil' the pork.. straight to the air fryer once marinated and air dry the surface. 

25-30 min with 180 degree, followed by another 10-15 min with 200 degree and Ta La!! DONE!!

------------------------------------------

Recently found another recipe

Few cut on the skin

190 degree
1. put hot/normal water (easy cleaning) , 5 minute
2. put the pork in with salt - 35 min 

200 degree
1. take out the salt + aluminium = 25 min
2. another 5 min


Wednesday, April 20, 2016

香蕉蛋糕

Recipe from a friend. Been tried for few times, the result not bad, but feel a bit dry.

材料:
a)3/4 cups Brown sugar (3/4 cups) 
b)1/2 cup 油 (1/2 cup oil) 
c)面粉 2 cups (
d)1 teaspoon baking powder
e)1 teaspoon baking soda
f)香蕉2-3只,用叉子压烂,无需太细

g)1/2 cup of milk
h)葡萄干一把(可不加)


作法:
1)180度预热烘炉
2)倒入
面粉, sugar, baking powder, soda powder 搅匀
3)mashed 香蕉, 油 搅匀
4)倒入3)into 2搅匀
5)倒入 milk 搅匀
6 倒入烘盘中,180度烘20-30  min 至熟(用竹签插入,拔出没粘面糊即熟了)

============================================================
Another recipe that I found out turned up good as well. Updated April 2020 


香蕉蛋糕配方:
A
香蕉: 3根 (i am using 4 medium size)
融化无盐黄油:120克  1/2 杯 (1/2 cup butter~120 g ) 
鸡蛋:两个 (2 eggs) 
红糖: 95克 1/2 杯  ( used 6 tbsp brown sugar)

B
中筋面粉: 300克 2杯 (2 cups flour) 
盐:2克   (1/2 tsp salt) 
小苏打:2克 ( 1/2 tsp soda baking) 
泡打粉:4克 (1 tsp baking powder) 
碧根果:70克 1/2 杯  (optional) nuts 

Instruction.
1. Add in dry ingredients A and mixed well.
2. Add in wet ingredient B and mixed well.

3. 预热好的烤箱350°F / 175°C烤一个小时,一个小时后去掉铝箔纸再烤10-15分钟
Bake 175°C for 1 hour

Joelle recipe
150 celcious - 1 hour
1.5 cup of Self Raising Flour
1 tsp Baking Soda
3/4 cup sugar (1/2 cup sugar)
3 banana (or 2 big banana)
1/2 cup of oil = 90g
2 eggs = 110g
40 min 180c / 200c

棉花蛋糕

Recipe from FB Ong Sok Hwee

顾名思义像棉花般柔软
材料:
牛油/油 50ml
低筋面粉80g过筛(可以64g面粉+16g蜀粉取代)
鲜奶90ml
蛋黄80g搅散
全蛋 1个打散
蛋白160g
细砂糖80g+盐1/3茶匙
作法:
1)预热烘炉160°C
2)牛油放入锅中开小火将牛油煮溶熄火(边煮边搅拌,若是用油就将它煮沸)立刻倒入低筋面粉搅匀,鲜奶分三次倒入搅匀,倒入全蛋搅匀,蛋黄分三次倒入搅匀(面糊是液态状的)过滤
3)蛋白放入无油无水的干净盆中用电动打蛋器快速打出大泡泡后分三次加入细砂糖继续打至提起打蛋器时蛋白呈小弯钩(不要打太久接近干性发泡)
4)将1/3的(3)倒入(2)中轻轻拌匀后全部倒入(3)中以切拌的手势轻轻拌匀(不要拌太久)
4)从高处倒入底部铺了烘焙纸的7~8寸模中,刮平糊面然后将模轻轻在桌面蹬几下(去除气泡)
5)在另外一个较大的模子中倒入1/3满的热水(无需太热中高温即可)将(4)摆入(水浴法)再放入烘炉的倒数第二层,上下火160°C烘20分钟或至稍稍上色
6)将上火调低至150°C烘10分钟
7)将上火调低至120°C烘70分钟或至熟(若糕面颜色转深可盖张铝箔纸以防烧焦)
8)取出脱模去除烘焙纸放凉即可

手工糖面包

Recipe from fb Ong Sok Hwee

材料:
高筋面粉300g(过筛)
盐1/2茶匙
细糖60g
打散的蛋液1汤匙
酵母1茶匙
温水160ml(以不烫手为准)
软化牛油30g
刷面:
蜂蜜1汤匙
粗糖适量
作法:
1)将所有的材料顺序倒入容器中(牛油除外)水慢慢倒,用双筷子边倒边搅,搅至看不到液体
2)倒在桌面搓匀 + 牛油搓匀后抓起面团往桌面甩(此时面团是会粘手的),重复甩打的动作至能将面团撑开呈薄膜状,整圆放入抹了油的容器中,手粘少许水抹在面团的表面(不要太湿)加盖静置发酵1小时(2倍大)
3)倒在桌面,用手轻轻压排气,分割出 8 ~12 等分整圆盖住,静置松弛15分钟
搓成长条再盖住静置松弛15分钟(若会沾手可在手上抹少许面粉)
4)取一条弯成U型后相互交叉呈绳索状,放到 10X8 寸烘盘上,将每根“绳索”合拢并排盖住,静置40分钟
5)预热烘炉160°C,10分钟
6)将 4)放入烘炉的中间层,160°C 烘 15~20分钟至呈金黄色取出(我用小型面包烤箱所以颜色不是很均匀)
7)趁热刷上蜂蜜再撒上粗糖即可

Thursday, September 26, 2013

Pandan戚风

I am refering to https://www.christinesrecipes.com/2013/06/pandan-chiffon-cake.html


蛋黃糊材料:
  • 蛋黃5 隻
  • 幼砂糖 20克 (1.5 tbsp)
  • 低筋粉 100克 (1/2 cup + 1 tbsp)
  • 泡打粉(baking powder) 1茶匙
  • 椰汁 100毫升
  • 班蘭汁 2湯匙(做法見下)
  • 班蘭香精(pandan essence 或可不加) 幾滴
  • 橄欖油 3湯匙
蛋白霜材料:
  • 蛋白 5隻
  • 幼砂糖 60克 (6 tbsp)
  • 塔塔粉 ½茶匙
班蘭汁材料:  ( 2湯匙)
  • 班蘭葉(新鮮或急凍) 10片
  • 水 1½湯匙

Report this ad
做法:
  1. 預熱焗爐至 170C / 338F.
  2. 用打蛋器把蛋黃和20克幼砂糖拌勻。 倒進椰汁,班蘭汁和幾滴班蘭香精(如果落的話),徹底拌勻。
  3. 把低筋粉和泡打粉拌勻。分三次篩入蛋黃混合物中,輕手拌勻。拌入油。備用。
  4. 用一個乾淨大盤(必須沒水沒油沒蛋黃黏著), 用電動搞拌器把蛋白打至起泡。拌入塔塔粉。分三次加 60克糖,並打發至蛋白霜企身起角。提起打蛋器時,蛋白尖峰不下垂。若反轉蛋白盤,蛋白也不流下來。
  5. 分三次把蛋白霜拌入麵糊中,用 fold-in 方法輕手拌勻。倒進蛋糕模,放入預熱焗爐中,焗約35至40分鐘。入爐焗了15分鐘後,把焗爐溫度降至150C / 302F,直至熟透。用針斜插入蛋糕中央測試,沒麵糊黏著,即是熟透。
  6. 拿出焗爐,反轉倒扣在鐵架上放涼。完全冷卻後,就可以脫模,即成。
班蘭汁做法:
  1. 把班蘭葉剪成粗塊。放入食物搞拌器中,加1½湯匙水,搞碎。
  2. 把搞碎的班蘭葉放入紗布中,用乾淨的手榨出班蘭汁。這食譜需要大概2湯匙班蘭汁。如沒有紗布,也可只用手榨汁。
=====================================================
This one use normal flour

Flour - 120 gram
Caster Sugar - 100 gram
Eggs - 6
Baking powder - 1/2 tsp
Tartar powder - 3/4 tsp
Coconut cream - 1/2 bowl
Oil - 1/2 bowl
Pandan juice - 5 tbsp
Abit of salt 

Instruction
1. Beat the egg white first, add in sugar and tartar sugar (High speed)
2. Egg yolk + Oil + coconut cream + salt + orange (pandan) - Low speed
3. Add the flour + Baking powder into egg yolk batter and mix..
4. Add in egg white batter into Step 3 batter.

Preheat oven, 160 celcious, bake for 15 min, lower to 150 degree for another 20-25 min. 

Wednesday, May 1, 2013

Pumpkin muffin 南瓜玛芬


玛芬(Muffin),是一款简单制做的一种点心,没有基础的新手也可以轻而易举的获得成功的满足感。玛芬以南瓜的自然香甜为主,做好后看到金灿灿的颜色很漂亮,吃进嘴里如扎实得来有点松发兼湿润的口感,还会有浓郁的蛋奶香。。。。味道实在太赞了!让人食欲大开!

材料:
橄榄油60克,
全蛋一只,
牛奶170克,
白糖80克,
蜂蜜40克,
熟南瓜泥150克,
低筋面粉(cake flour)180克,
全麦面粉(whole wheat)60克,
泡打粉1小匙(baking powder 1 teaspoon),
苏打粉1/2小匙(baking soda 1/2 teaspoon),
盐1/4小匙(salt 1/4 teaspoon).

做法:
1, 南瓜蒸熟后用叉子压成泥放凉待用.烤箱预热至180摄氏度.
2,把低筋面粉全麦面粉泡打粉苏打粉和盐混合后过筛备用.(就是把所有的粉类和盐混合过筛)
3,在搅拌容器中放入所有的湿料:橄榄油,鸡蛋,牛奶,白糖,蜂蜜,然后用搅拌器打匀至白糖融化约一分钟.
4,把过筛后的粉类加到湿料中,搅拌均匀.再把南瓜泥拌和进去.
5,玛芬模子中抹油防沾或者直接放纸模杯,把面糊舀到模子里.这个配方可以做12个玛芬.
6,烤盘入预热的烤箱,烤25分钟或者用牙签试验不沾即可出炉.
7,把玛芬从模子中取出放在烤架上让潮热湿气散发.


紅豆花型麵包


http://dodocook.com/recipe/39085
花型麵包造型非常好看
以橄欖油替代奶油製作愛心麵包讓家人享用
清爽無負擔、不必花很多錢吃胖
再花很多錢減肥XD

紅豆餡有特調的秘密武器
讓來家裡做客的親友吃到
都不斷問我是怎麼做的呀
那麼好吃~~~~

預備食材
紅豆餡
紅豆 300克
砂糖 150克
麥芽糖 1大匙
 1小匙
醬油 15毫升
麵糰
高筋麵粉 220克
酵母粉 3克
 20克
 1小匙
橄欖油 30毫升
鮮奶+全蛋液 130毫

1.將所有材料混合,揉至可以拉出薄膜。
美麗好吃的《紅豆花型麵包》食譜作法,步驟3
2.整圓、發酵一個小時。
3.按下去的凹痕不會消失就是發酵完成。
4.分成六份、整圓型。
5.擀麵棍擀開--寬約20公分、高約12公分。
美麗好吃的《紅豆花型麵包》食譜作法,步驟4
6.大約在2/3處切一條一公分、直到切完整片。
7.取25克的紅豆餡捏成長條,放在麵皮上頭。
8.左右兩片較小的往內摺。
9.包起來、接合處稍微捏緊麵團。
美麗好吃的《紅豆花型麵包》食譜作法,步驟5
10.繼續捲、接合處捏緊。
11.頭尾連起來捏合成圓形花朵狀。
12.二次發酵30~40分鐘。
13.表面刷蛋液、撒上白芝麻,烤箱預熱180度烤15分鐘。
美麗好吃的《紅豆花型麵包》食譜作法,步驟6
每一個都烤得好漂釀唷^^好好吃

Thursday, April 11, 2013

香蕉蛋糕

Malaysia very easy to get banana cake with very cheap price, about RM3-5 ($1-2), probably because you can easily get banana everywhere ... Found this recipe from christine blog, easy to do and the ingredients easily get in Melbourne as well, as Christine is live in Australia too.. :)

Most important is my kids like it..  no point for me to trouble and mess up the kitchen with something no one to eat ..hehe.. At least it can replace one of the meal... Breakkie or lunch :)


well, i am using a bigger size mold... so my cake a bit too long and not enough thick..but taste still YUMS!!

預備一個長形蛋糕模 11.5cmx22cmx6cm

材料:
  • 牛油(奶油,室溫置軟) 100克
  • 黃砂糖(brown sugar) 90克
  • 熟香蕉泥(用熟香蕉肉搓爛成泥糊) 200克
  • 雞蛋(打散成汁) 2隻 約120克
  • 牛奶 50毫升
  • 低筋粉(cake flour)120克
  • 發粉(baking soda)1/2茶匙
  • 鹽 1/4茶匙
  • 合桃(walnut)稍切粗粒55克
做法:
  1. 預熱焗爐至180C (356F).
  2. 把軟化了的牛油和糖,用電動搞拌器打發至淡黃色,約 4至 5分鐘。
  3. 把蛋汁分三次加入打發的牛油中,每次完全混合。倒進牛奶混合成為蛋漿。
  4. 加香蕉泥入蛋漿中,用膠刮或木匙拌勻。
  5. 先把麵粉,發粉和鹽混合。然後篩入,拌勻成麵糊。最後加入合桃(留少許合桃灑在麵糊上面)。倒入長型蛋糕模中。焗約40至45分鐘,或表面金黃色,直至熟透。用針插入蛋糕,沒麵粉漿黏著,即熟透。放在鐵架上放涼。切片,享用。

Source: http://www.christinesrecipes.com/2009/12/banana-walnut-cake.html#ixzz2Q7Qz2rVU

Another one from the same source provider 
材料:
  • 3至4隻 熟透的香蕉(用匙羹壓爛)
  • 1隻 雞蛋(打散)
  • 1/3 量杯(60克) 牛油(先行融化)
  • 3/4 量杯(150克) 糖 (白糖或黃糖都可以。如果喜歡深色些,就用黃糖啦)
  • 1茶匙 雲呢拿香油 (vanilla extract)
  • 1茶匙 蘇打粉(baking soda)
  • 鹽少許
  • 1½ 量杯(245克) 中筋麵粉 (plain flour / all-purpose flour)
    (i mixed 1 cup of plain flour and 1/2 cup of cake flour)
  • 牛奶 1/4 量杯(或1/2 量杯,視乎麵糊的濕度而定)
這個食譜非常簡單,不用打蛋器,只需要一個木匙羹或膠刮。

做法:
  1. 先把焗爐預熱到175C/350F. 
  2. 用木匙羹先把融化了的牛油加入壓爛的香蕉蓉中。混入糖,打散的蛋汁和雲呢拿。先加牛奶 1/4 杯(可在拌入麵粉後,視乎麵糊的濕度再加少許牛奶調節)。
  3. 灑下蘇打粉和鹽入上述材料中,搞勻。分三次篩入麵粉,拌勻,沒有粒狀物。
  4. 在4x8英寸的糕盤底部及四週,輕輕掃上少許牛油。把拌好的粉漿倒入糕盤。放入焗爐約1小時。可以用一枝針插入中間部分,拿出的針沒有粉漿黏著的話,即是蛋糕熟了。放在鐵架上待涼。

更多内容: http://www.christinesrecipes.com/2008/04/banana-cake-recipe.html#ixzz2Xer69bZT

Monday, March 25, 2013

牛油餐包


I like cooking, but really a bit 'headache' on baking... the bread that came out always under expectations... hehe.. but this looks easy and delicious, wanted to try it 1 day...  wish me good lucks then !!

牛油餐包 Butter Buns03

材料:
  • 高筋粉 250克
  • 低筋粉 25克
  • 快速酵母 5克
  • 奶粉15克
  • 幼砂糖 40克
  • 鹽 1/2茶匙
  • 和暖清水 100毫升
  • 和暖牛奶 80毫升
  • 牛油(奶油 butter 置室溫軟化) 40克
  • 蛋汁(塗麵團用) 少許
牛油餐包製作圖 How To Make Butter Buns

做法:
  1. 把所有材料(除牛油外),用手搓或麵包機(基絲汀今次用坐檯搞拌器),搓勻。加入牛油,搓至麵團可拉開薄膜狀態(見右上角小圖)。滾圓,置入已薄薄地塗上油的盤中,用保鮮膜蓋好。進行第一次發酵,直至麵團發大兩倍,約 1小時。
  2. 用手按壓麵團,擠出空氣。取出麵團放在清潔的工作台上,灑點高筋粉。切割成 8等份,滾圓,排在輕塗油的圓焗盤中(見右下角小圖)。用保鮮膜蓋著,進行第二次發酵,直至麵團發大至盤邊緣,彼此輕輕擠壓著,約 1至 1½小時。
  3. 就快完成發酵前 5至 10分鐘,預熱焗爐至 170C/ 335F. 麵團表面輕輕掃上蛋汁。放入焗爐,焗約 20至 25分鐘。拿出焗爐,放在鐵架上 2至 3分鐘,脫模。置鐵架上放涼至和暖,即可享用。或待完全放涼後,存放在密封的膠袋或膠盒中。
牛油餐包 Butter Buns02

溫馨提示:
  • 這些小餐包質感柔軟。隔天吃,仍保持柔軟。可稍微用焗爐翻熱,也像剛出爐的一般。
  • 繁忙上班/上課一族,可前一晚做好麵團。排入焗盤中,進行第二次發酵,但又未完成,直至小麵團發大到彼此接觸。就用保鮮膜密封好,放入雪櫃(fridge)。第二天早上,拿出整盤麵團(不要拿走保鮮膜),置室溫中回暖,並發酵至少兩倍大,約 1小時。然後跟做法 3放入焗爐烤焗就可以了。
  • 留意:麵團在雪櫃中仍會繼續進行發酵,只不過在低溫環境中,酵母的活動減慢而已。所以,切勿讓麵團留在雪櫃太久,以免過度發酵,否則麵團就會有酒味啊。


更多内容: http://www.christinesrecipes.com/2012/10/butter-buns.html#ixzz2OWePglPK

Friday, February 22, 2013

海鮮忌廉湯 Seafood Soup with Puff Pastry

I really want to try this one day ...
 
焗酥皮海鮮忌廉湯 Baked Seafood Soup with Puff Pastry

三人份量

材料: 
  • 海鮮雜錦 (marinara mix) 300克
  • 洋蔥 1/2個
  • 酥皮(puff pastry) 1塊
  • 雞湯(或魚湯) 1 1/2 杯
  • 清水 1/2 杯
  • 白酒(white wine) 2湯匙
  • 牛油(奶油 butter)2湯匙
  • 麵粉(plain flour)2 1/2湯匙
  • 鮮奶(milk) 1/2杯
  • 鮮忌廉(thickened cream)1湯匙
  • 雞蛋(打散成汁) 1/2 隻
  • 洋芫荽碎(parsley)少許
  • 橄欖油 酌量
  • 鹽 酌量
  • 胡椒粉 少許


更多内容: http://www.christinesrecipes.com/2009/03/baked-seafood-soup-with-puff-pastry.html#ixzz2LbJ3iZMy

椰汁年糕

This recipe looks not bad... will definitely try 1 day... then only insert the photo.. Most prob i will do 1/2 of the recipe as suggested..

原來的食譜

材料:
  • 10隻雞蛋
  • 1 包糯米粉(500克)
  • 1 罐椰汁(500 毫升)
  • 500克白砂糖
做法:
  1. 把雞蛋和白砂糖先打勻。
  2. 把椰汁和糯米粉加入蛋汁中攪勻。
  3. 焗爐預熱180度C.
  4. 用24cm x30 cm方焗盤,或用兩個較小的焗盆(不要太深,否則很難焗熟。)先把焗盤邊抹油,在底部放上 baking paper (以防黏底)。
  5. 把攪伴好的粉漿隨隨倒入焗盤,並輕搖,在台上拍一兩下,使粉漿中的氣體走出來。放入焗爐焗50分鐘至一小時(注意:每個焗爐熱度不同的。)焗至表面金黃色,用一枝針或牙簽插入年糕,沒有粉漿黏著的話,即年糕已熟。
溫馨提示:
  1. 甜度可因應各人口味而調較。我只用400克白砂糖。
  2. 這個食譜的份量頗多。把各項材料減半,已足夠一家四口吃飽喔。
  3. 伴以鮮忌廉一起吃,味道很夾,不錯呢!

更多内容: http://www.christinesrecipes.com/2008/02/blog-post_05.html#ixzz2La2nE1Cl

Wednesday, February 20, 2013

Egg Tart

I copy this recipe from wokkingmum blog, which is one of my favorite blog to browse as her recipes are just simple and the outcomes are awesome .. 

you can replace the crust by using the ready-made puff pastry from supermarket. I used that for my 1st trial.. not bad.
Ingredients for Crust:

  • 340g Top Flour
  • 230g Butter
  • 70g Caster Sugar
  • 1/2 Beaten Egg

Ingredients for Egg Custard filling:
  • 3 Eggs
  • 80g Caster Sugar
  • 70ml Milk (I use Fresh Milk)
  • 210 ml Water
How to do it:
  1. Beat butter and sugar until creamy.
  2. Add egg into mixture and mix until combined.
  3. Add flour and mix into a dough.
  4. Cover dough with cling wrap and keep in the fridge for 30 minutes.
  5. Weight dough into 25g each (depending on size of mould) and press into egg tart moulds.
  6. Set aside.
  7. Whisk eggs and sugar until think and creamy.
  8. Add milk to mixture and continue to whisk until combined.
  9. Add water gradually and continue to whisk together.
  10. Pour into mould tart dough.
  11. Preheat oven at 180C and bake for 25 minutes of till the crust is slightly brown and egg custard is set.

  12. Remove from mould by turning the mould upside down.
Note:
I rolled the 20g dough into a ball and flatten it before put it into the mould.


http://wokkingmum.blogspot.com.au/2007/12/egg-tarts.html

蝴蝶酥


蝴蝶酥是經典法式甜點。
i copied from christine's blog included the picture.. its really easy to made and convenience as using the read-made puff pastry.. i got it from coles. I tried once.. my kids like it very much..

約可做 18隻份量

材料:

  • 急凍酥皮(puff pastry 室溫解凍)1塊, 24cmx24cm
  • 幼砂糖 約 1/4杯
  • 牛油(奶油 butter 先行融化)酌量


做法:

  1. 把焗爐預熱至 200C (392F).
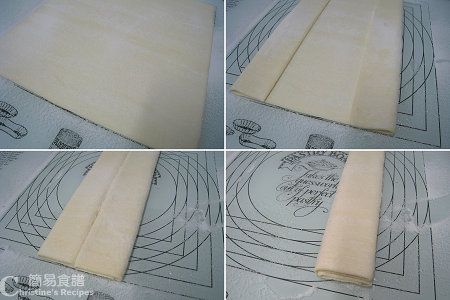
  2. 在工作台上,用篩平均灑下一半糖,把解凍後的酥皮小心鋪在上面。輕輕掃點牛油。在上面灑下另一半糖。把一邊的酥皮向內褶四份一,再向內褶多一次到中間位置;另一邊也如是(如上圖示)。最後,把兩邊復合成六褶的長條形。用手輕輕按壓。目的是令酥皮黏得好,焗的時候不會彈開。放入雪櫃(冰箱 fridge)冷藏 20至 30分鐘。
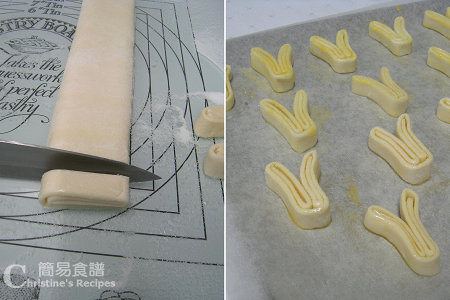
  3. 用利刀切開約 1/2吋闊的幼條。兩面塗點融化牛油。把上面兩邊稍稍分開,焗後就會像蝴蝶雙翼的形狀。
  4. 放入焗爐焗約 20分鐘。焗最後 5至8分鐘翻轉另一面繼續焗,直至兩面金黃色並鬆脆,即成。


溫馨提示:
  • 喜歡的話,可以用雲呢拿(香草vanilla)糖,就更添香味。
  • 雲呢拿糖在超市有售。或自己製造:把雲呢拿 vanilla 切開,用刀刮出種子,連莖放入密封的糖樽,與糖拌勻,蓋好就可以。需用時取出。
  • 如果快手褶好酥皮後,酥皮不太軟,可直接放入焗爐,可省卻放入雪櫃那步驟。
  • 如果你的焗爐有 fan-forced 設備 (即是加風扇吹熱風),最好用它,因為熱力較均勻,焗出來的蝴蝶蘇顏色均勻漂亮。我就是用了 fan-forced,溫度則調至 180C.(註:溫度作參考,因應每個焗爐的熱力不同。)


更多内容: http://www.christinesrecipes.com/2009/07/palmiers-recipe.html#ixzz2Gp1QOhs0